A child with pain low on the right side of the belly, off food and unwilling to move, raises one question first: is this appendicitis? Ultrasound is the scan that answers it without radiation. On a small body the micro-convex probe is what lets the scan reach the appendix. Its footprint is narrow enough to press in below a child’s ribs or above the hip, clear of bone. Its frequency runs high enough to show a structure only a few millimetres across.
The scan itself is a hands-on search. The sonographer presses slowly over the spot the child names as sorest, follows the cecum down to where the appendix begins, and judges three things about it: how wide it is, whether it compresses, and what the tissue around it looks like. In a child that radiation-free answer carries extra weight, because the path it replaces runs through CT and its dose. What follows starts with the probe that makes the scan possible on so small a body.
Why ultrasound goes first in a child with right-sided pain
The diagnosis of appendicitis sits on shaky ground when it rests on the belly alone. The classic story — pain moving from the navel to the right lower corner, loss of appetite, a low fever — appears in many children who turn out to have something else entirely. It also stays quiet or odd in a fair number who do have appendicitis, especially the very young. Imaging is what turns a suspicion into a decision. For a child the first scan reached for is ultrasound. It shows the appendix directly, asks for no contrast, and sends no radiation into a growing body.
The radiation point carries real weight in a child. A child’s tissues are more sensitive to it. A child also has many decades ahead for any late effect to surface. CT scans the abdomen in seconds and reads the appendix well. The dose it carries is the reason guidelines still place ultrasound first in young patients. When ultrasound gives a clear answer, the child avoids CT altogether. When it falls short, the next step is usually MRI, a scan that also spares the child radiation.
The trade-off is that ultrasound leans on the person holding the probe. It takes a trained hand to find a small appendix buried under bowel gas. The same scan in two sets of hands can return two answers. This is the part that rewards a clear technique and a probe matched to the job. The rest of this article works through both. A handheld micro-convex scanner puts that ability at the bedside — in the emergency department, on the ward, or in a clinic with no radiology suite down the hall.
The micro-convex probe on a small abdomen
A micro-convex probe is a curved array on a small head. The curve spreads the beam into a fan, so a narrow contact patch still opens a wide view deeper in. On a C10-style handheld probe the footprint is about the size of a thumb. It presses into the narrow gap between a small child’s hip bone and lower ribs with ease. The frequency sits in the middle range, around 5 to 8 MHz. That is high enough for detail close to the surface. It reaches deep enough for an appendix that lies well back.
For a thin child a high-frequency linear probe gives the sharpest picture of the appendix. Its flat face and 7-to-15 MHz beam resolve the wall layers in fine detail when the appendix sits close to the skin. The limit shows up in larger or older children, where the appendix can lie beyond the reach of those high frequencies. The micro-convex probe gives up a little of that near-field sharpness. In return it brings depth and a small footprint that reaches spots a flat linear face misses.
On a handheld scanner the micro-convex probe carries another advantage. It covers a wide span of body sizes with one transducer. A clinic that sees newborns in one hour and ten-year-olds the next cannot always swap probes between patients. One micro-convex head handles the small infant abdomen at a higher setting. It drops to a lower setting for an older child’s deeper appendix. The workflow stays simple at the bedside. For the appendix in particular, the image holds enough detail to measure the tube and test its compression.
Before the probe touches the child, the preset matters. An abdominal or bowel preset puts the focal zone at the depth where the appendix sits, usually two to five centimetres down, and sets the dynamic range to show soft-tissue detail. Harmonic imaging cleans up the picture in a child carrying a little more body fat. Color Doppler stays ready on the machine, since blood flow in the appendix wall becomes part of the read. A handheld unit keeps these as one-tap presets, so setup takes only seconds at the bedside.
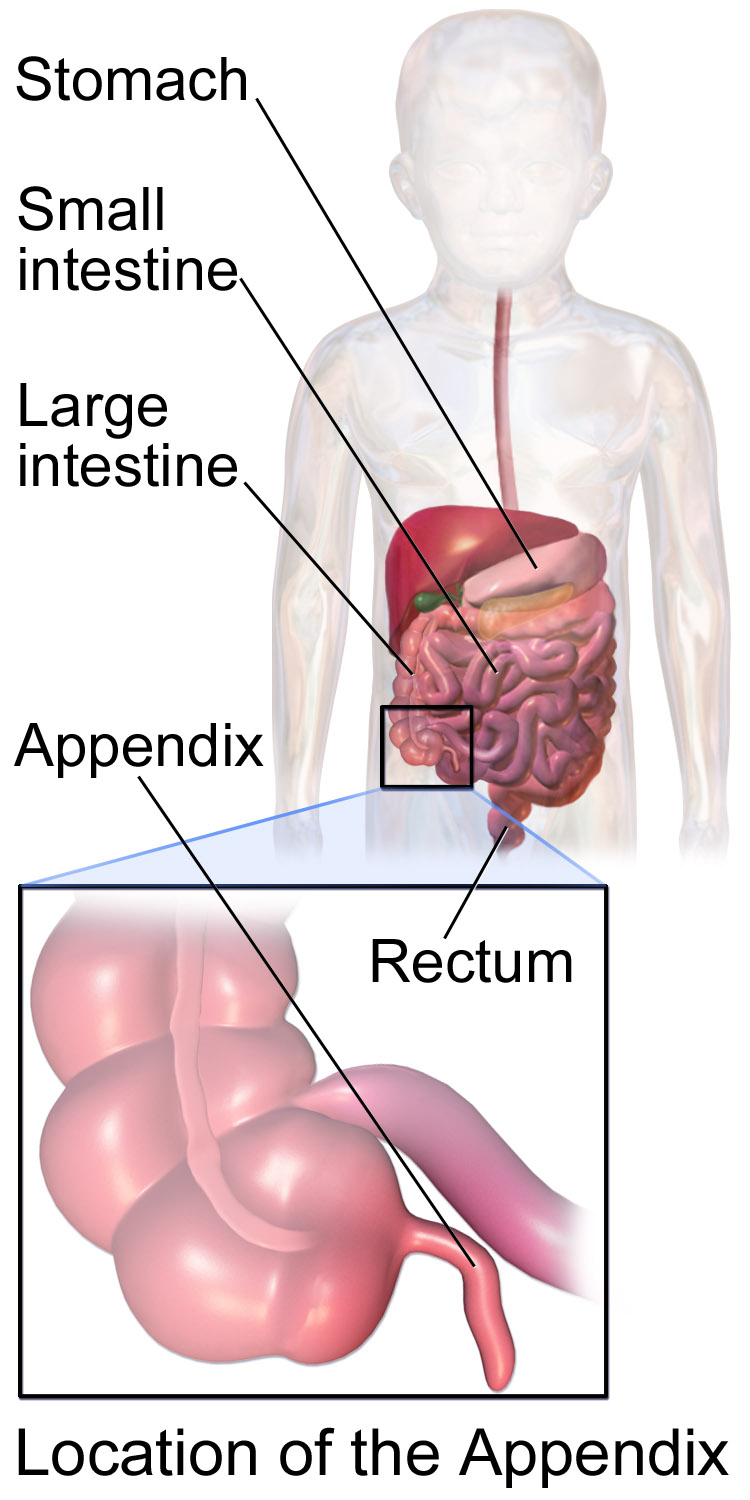
The appendix in a child hangs from the base of the cecum, where the large intestine begins. The inset traces it to that junction in the right lower abdomen, the landmark a scan tracks down to before the search for the appendix starts. The labels mark the stomach, the small and large intestine, the appendix, and the rectum.
Graded compression, the core technique
Graded compression is the technique that makes appendix ultrasound work. The sonographer sets the probe over the spot the child points to as the sorest, then presses down in a slow, steady push. The pressure drives the gas-filled loops of normal bowel out of the path of the beam. Done gently and in stages, it is well tolerated. A coached, distracted child usually lets the scan run. The appendix is inflamed and fixed in place, so it stays put under the probe as the soft bowel around it slides away.
The search runs in a fixed order. The sonographer does not wander at random. The probe starts at the ascending colon on the right and tracks downward to the cecum, the pouch where the large bowel begins. The appendix hangs off the base of the cecum, so that junction is the landmark to settle on. From there the sonographer sweeps the right lower quadrant in two directions, across and along, looking for a blind-ending tube. The point of maximal tenderness guides the search, since an inflamed appendix usually sits right under the sorest spot.
What a normal appendix looks like
A normal appendix is easy to miss. That is part of the point. It is a thin, soft tube that collapses under gentle pressure and folds out of the way like the bowel beside it. When it is seen, it shows up as a small blind-ending structure, closed at the tip, with a thin wall and a narrow or empty center. It does not push back against the probe. Its wall shows no brisk blood flow on color Doppler.
Size is the anchor. A normal appendix measures under six millimetres across its outer wall. Most sit well below that, around three to five millimetres. The number runs from outside wall to outside wall, with the appendix squashed as flat as it will go under the probe. Measuring at full compression matters. A soft, normal appendix gives way and flattens. A stiff, inflamed one resists the probe and keeps its shape. The same six-millimetre mark separates normal from suspect in children and in adults.
Shape and movement help confirm a normal loop. Real bowel beside the appendix peristalses. It ripples and squeezes on the live image. The appendix itself does not peristalse, so a tube that lies still points to the appendix. Small bowel keeps moving on the screen. A normal appendix also bends and slides freely under the pressing probe, moving with the tissue around it. It carries none of the stiffness that marks an inflamed one.
The appendix does not always sit where the textbook draws it. In many children it points down into the pelvis. In some it tucks behind the cecum, a retrocecal spot screened by a curtain of bowel gas. It can lie near the midline or low against the bladder. A sonographer who finds nothing at the classic spot moves the probe through these positions before calling the appendix absent. Shifting the child, such as a roll onto the left side, can bring a hidden one into view.
Put these together and a normal study shows a thin appendix that compresses flat, measures under six millimetres, lies quiet with no brisk wall flow, and sits among bowel that ripples around it. A child with that picture and a settled belly is unlikely to have appendicitis at that moment. The harder calls come when one feature drifts — a tube that measures right at six millimetres, or an appendix no one can find. The rest of this article works through the inflamed appendix and those gray-zone readings.
The diameter rule and its gray zone
The six-millimetre rule is the best-known number in appendix ultrasound. It deserves a careful reading. An outer diameter above six millimetres, measured at full compression, is the threshold that flags an appendix as enlarged. One study in children measured this sign at close to 95% sensitivity. Non-compressibility scored higher still. The figure is sensitive: most inflamed appendices clear it easily, often reaching eight, ten, or more millimetres. A clearly enlarged, non-compressible tube with a tender belly over it sits close to a diagnosis by itself.
The trouble lives between six and seven millimetres. A measurement of exactly six can be normal. It can also be early appendicitis. The number alone does not settle the case. A tube in that range pushes the sonographer to lean on the other findings: whether it compresses, whether the wall is thick, whether the fat around it has turned bright, whether blood flow has picked up. Some centres treat seven millimetres as the firmer cutoff and read six to seven as equivocal, a range that calls for the secondary signs or a repeat scan.
Numbers carry this read more than impressions do, so it helps to keep them in one place. The table below gathers the measurements and machine settings that come up most in a pediatric appendix scan. Each row pairs a feature with the figure a sonographer checks it against at the bedside, from the diameter cutoff to the frequency the probe runs at.
Pediatric appendix ultrasound — figures that guide the read
Feature
Value / threshold
Note
Outer diameter (at full compression)
≥6 mm enlarged; 6–7 mm gray zone; ≥7 mm firmer
Primary sign
Normal appendix diameter
3–5 mm
Compresses flat
Wall thickness
>2–3 mm
Supports the read
Compressibility
Non-compressible = positive
Soft = normal
Appendicolith
Echogenic focus + posterior shadow
Raises perforation risk
Probe frequency, linear (thin child)
~7–15 MHz
Best near-field detail
Probe frequency, micro-convex
~5–8 MHz
Depth + small footprint
Pediatric US sensitivity (pooled)
~88%
Meta-analysis estimate
Pediatric US specificity (pooled)
~94%
Meta-analysis estimate
Non-compressibility and the target sign
Compressibility is the most telling sign in the whole scan. The sonographer presses the probe straight down over the appendix and watches what the tube does. A normal appendix flattens until its walls meet. An inflamed appendix swells and stiffens, so it holds its round shape no matter how firmly the probe pushes. That failure to compress, in a tube above six millimetres, is the finding that carries the most weight.
Cut across, an inflamed appendix shows a pattern called the target sign. The layers of the wall stack into rings: a bright inner lining, a darker muscle layer outside it, and the swollen wall around the whole. On screen it looks like a small bullseye, a few millimetres of dark rimmed by lighter tissue. The pattern confirms that the round structure is gut wall. A vessel or a lymph node would not stack into these layers. Color Doppler settles it further. Color floods a vessel on the screen. It does not flood the quiet appendix wall.
Blood flow adds another piece of evidence. Color Doppler laid over the appendix wall shows increased flow when the organ is inflamed, a sign of the extra blood an irritated tissue draws. In a child this hyperemia can be striking, the wall lit with color around a dark center. The sign supports the diagnosis when it is present. Its absence does not clear the appendix, since flow can be hard to capture in a small, restless patient and can fade in a late, failing appendix.
Wall thickness rounds out the picture. A normal appendix wall is thin. Inflammation thickens it past two to three millimetres. The thickening tracks the wider overall diameter. Both rise together in an inflamed appendix. Read alongside the diameter and the failure to compress, a thick wall adds confidence to the call. It does not stand alone. No single number makes the diagnosis. The inflamed appendix shows several signs at once, and the sonographer reads them as a set.
The appendicolith
One finding stands out for what it warns of: the appendicolith. This is a hard stone of packed stool and minerals lodged in the appendix. On ultrasound it shows up as a bright spot that throws a dark shadow behind it, the same way a gallstone or a kidney stone does. A stone blocking the appendix traps secretions behind it and drives up the pressure that sets off inflammation, so its presence both supports the diagnosis and marks a higher risk of perforation. Finding one in a child with right-sided pain pushes the case toward surgery. Noting whether it still sits inside the appendix or has slipped free into the abdomen guides what comes next.
Secondary signs around the appendix
The appendix does not inflame in isolation. The tissue around it changes in ways the probe can read. The fat that wraps the appendix turns bright when it inflames, standing out against the darker fat farther away. This bright fat often marks the right spot before the appendix itself comes into focus, pulling the sonographer’s eye to the place to press. A patch of bright, non-compressible fat over a tender point is a strong clue even on a quick look.
Free fluid is a second sign to look for. A little clear fluid in the right lower quadrant or down in the pelvis is common with an inflamed appendix, pooling in the low spots around it. A small pocket of clear fluid can come with early inflammation. A larger or complex collection full of debris raises concern for a perforation that has spilled. Enlarged lymph nodes often sit nearby as well, a sign the body is reacting. Nodes alone are not specific. They turn up in many other childhood causes of belly pain.
These signs around the appendix carry weight when the appendix itself stays hidden. A sonographer who cannot bring the tube into view still reads the surrounding tissue. Bright inflamed fat and free fluid over a tender point can build a strong case by themselves. The signs also push the other way. A clean right lower quadrant, with no bright fat, no fluid, and a soft belly, lowers the odds that an inflamed appendix is hiding just out of view. Read together, the secondary signs turn a partial scan into a useful answer.
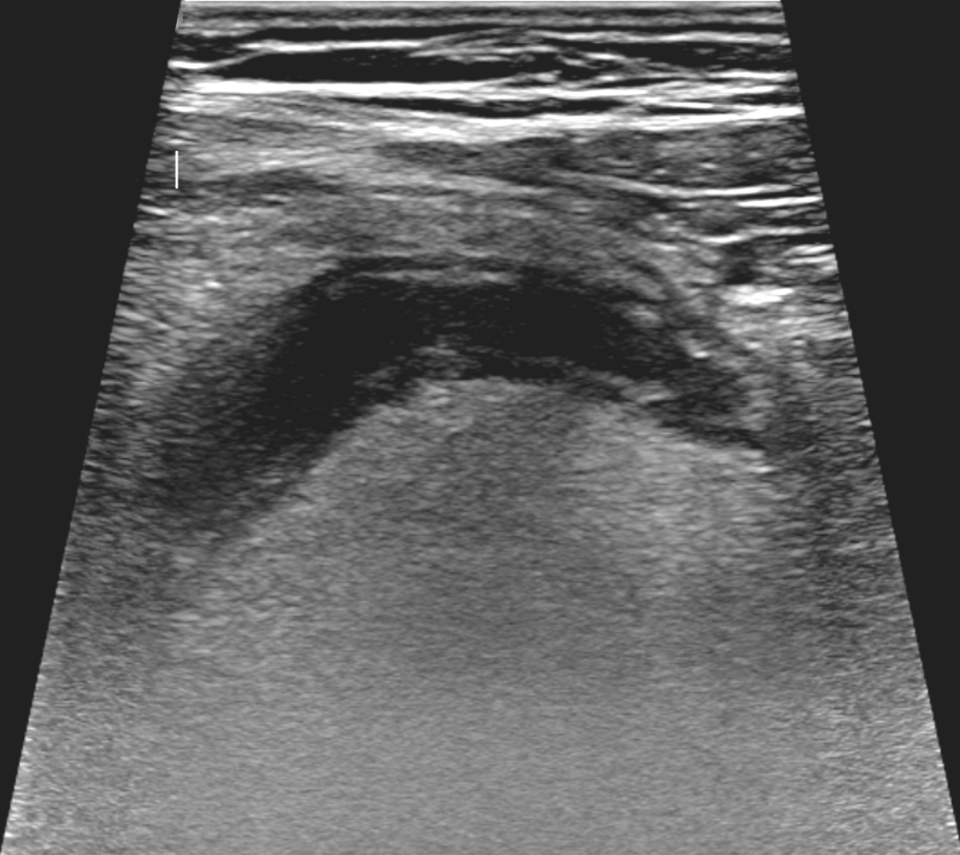
A long-axis ultrasound of an inflamed appendix: a dilated, fluid-filled blind-ending tube that does not flatten under the probe. The faint ticks along the left edge are the depth scale.
When the appendix cannot be seen
A normal appendix is hard to find. That simple fact shapes how the scan is read. Studies of children put the rate of non-visualization high. Even in skilled hands the appendix goes unseen in a sizable share of scans. Gas-filled bowel scatters the beam. A retrocecal appendix hides behind the cecum. In a larger child, more tissue sits between the probe and the target. None of these means the appendix is healthy. It only means the scan did not see it.
Several moves can rescue a scan that starts blank. More graded compression, applied patiently, can clear a path through gas that a first pass could not. Rolling the child onto the left side shifts the bowel and can drop a retrocecal appendix into view. Scanning up from the pelvis catches an appendix that points down low. A full bladder gives a clear window onto a pelvic appendix in a child who can hold one. Time spent working these angles is what separates a true non-visualization from a missed appendix.
What happens after a blank scan depends on the child in front of the clinician. A child whose pain is settling, who is eating and playing, and whose belly is soft can often be watched and rescanned a few hours later. More imaging can wait. The earlier scan was not wasted: a clean right lower quadrant, even with the appendix unseen, lowers the odds of advanced disease. Repeating the ultrasound after a few hours often brings a hidden appendix into view once the picture has declared itself.
A different child needs a faster path. A child who looks unwell, whose pain is sharpening and spreading, or whose belly guards against a resting hand points toward a problem that will not wait for a repeat scan in the morning. Here the team moves straight to the next test. There is no watching the clock. In most children that next test is MRI, a radiation-free scan that shows the appendix and the tissue around it. CT stays in reserve for the times when it is the only scan available, or the fastest route to an answer in an unstable child.
Saying clearly what the scan did and did not show keeps everyone on the same page. A useful report records whether the appendix was seen, its diameter, whether it compressed, and the state of the fat, the fluid, and the nodes around it. When the appendix is not seen, the report says so plainly and notes the secondary signs that were checked. Structured wording like this, used in many children’s hospitals, turns a single scan into a clear step in the child’s care. It leaves no loose impression for the next clinician to guess at.
Signs of perforation
A perforated appendix looks different from an intact inflamed one. The change matters for how fast the child goes to surgery. Once the appendix bursts, the swollen tube can lose its neat layered wall, the target sign breaking up when the structure comes apart. The appendix may grow harder to find at all, its outline blurred into the inflamed tissue around it. An appendicolith that has slipped out of the appendix and now sits free in the abdomen is a clear sign the wall has given way.
Fluid and tissue fill in the rest. A walled-off pocket of fluid near the appendix, with a thick rim and murky contents, points to an abscess where the body has fenced off the leak. Streaks of free fluid spreading farther through the abdomen suggest the spill has gone wider. Bright, swollen fat over a large area marks the inflammation reaching out from a burst appendix. These findings move a child up the list for surgery and shape whether the surgeon drains an abscess first or operates straight away.
What else mimics it
Right-sided belly pain in a child has a long list of causes. Ultrasound helps sort them. The first job is to confirm or rule out appendicitis. The second is to catch the conditions that copy it, since several of them need a different treatment and a few call for urgent surgery themselves. A handheld probe already resting on the belly can look for these in the same sitting, part of what makes a bedside scan worth running.
Mesenteric adenitis is the most common mimic in children. It shows enlarged lymph nodes clustered in the right lower quadrant, often after a viral illness, with a normal appendix nearby once the sonographer finds it. The nodes can be tender under the probe. The key to telling it apart is a normal-looking appendix sitting among the swollen nodes, since the nodes alone do not make appendicitis. Gastroenteritis can also bring cramping right-sided pain, with busy, fluid-filled bowel on the scan and, again, an appendix that reads normal.
Intussusception is a mimic with real urgency behind it, most often in a toddler. One segment of bowel telescopes into the next. On a cross-section it shows a thick set of rings, the target or doughnut pattern, larger and more layered than an inflamed appendix. It usually sits higher and closer to the middle of the belly than the appendix does. Catching it matters, since an early intussusception can often be pushed back into place with an air or fluid enema. The child is spared an operation. A handheld scan that spots the doughnut sends the child down a different, faster path.
In girls the ovary brings a further set of causes. A twisted ovary, a burst cyst, or a large cyst can all bring lower belly pain on the right. A sweep over the pelvis checks the ovaries when the appendix looks normal. Plain constipation is a common, gentler answer, with the colon loaded with stool on the scan and a soft belly under the probe. Urinary infection, and in older children a kidney stone, round out the everyday list. The value of the scan is that one pass with a handheld probe can sort a worrying cause from a mild one before the child leaves the room.
Putting the scan together at the bedside
A good pediatric appendix scan starts with the child. The machine comes second. A calm child holds still. Fear tightens the belly and fights the pressure that graded compression needs. A few minutes spent settling the child, letting a parent stay close, and asking the child to point with one finger to the sorest spot pays back in a clearer scan. That pointing finger marks where to start pressing, since the inflamed appendix usually sits right beneath it.
From there the read follows the findings in order. The sonographer finds the cecum, tracks to the base of the appendix, and presses to test whether the tube compresses. A blind-ending tube above six millimetres that holds its shape, with a thick wall and a target on cross-section, makes the diagnosis. Bright fat, free fluid, and brisk wall flow add their weight. An appendicolith or signs of perforation raise the urgency. Each finding goes into the record, and the whole set is read as one picture. No single box decides it alone.
The strength of the handheld micro-convex probe shows most at this last step. It brings a capable scan to the cribside, the clinic, or a busy emergency room, where a quick, radiation-free look can move a child toward surgery or toward home with real confidence. It does not replace a careful clinician or a skilled sonographer. A hard case still calls for a formal study or an MRI. For the everyday question of a child with right-sided pain, a clear handheld scan can answer it where the child already lies, in minutes, with nothing more than a probe and a trained eye.
Common questions
Can a handheld ultrasound really diagnose appendicitis in a child?
A handheld scan can find an inflamed appendix and read the signs around it well enough to guide care in many children. A clear scan — a non-compressible appendix above six millimetres, with a thick wall and bright surrounding fat — supports the diagnosis strongly. The limit is the appendix that cannot be found, which happens often. A blank scan does not rule appendicitis out, so a child with ongoing symptoms needs watching, a repeat scan, or another test.
Why does ultrasound come before CT in children?
Ultrasound carries no radiation. A child’s body is more sensitive to radiation than an adult’s. A child also has many years ahead for any late effect to surface. Guidelines put ultrasound first in children for that reason. CT stays in reserve for cases where it is the only or the fastest answer. MRI is the usual next step when ultrasound is not enough.
What does the six-millimetre rule mean?
Six millimetres is the outer diameter that flags an appendix as enlarged, measured at full compression. Most inflamed appendices pass it easily and reach eight to ten millimetres or more. A tube right at six sits in a gray zone, where the sonographer leans on the other signs: compressibility, wall thickness, the fat around the appendix, and blood flow. The number is a strong starting point. It is read together with the rest of the scan.
Which probe is best for a child’s appendix?
Two probes suit the job. A high-frequency linear probe, around seven to fifteen megahertz, gives the sharpest view of a shallow appendix in a thin child. The micro-convex probe, around five to eight megahertz, works better on a deeper appendix or a larger belly, where its narrow curved face fits spaces a flat linear face misses. On a handheld scanner one micro-convex head covers infants through older children, which keeps the setup simple. Many sonographers start with the linear probe in a small child and switch to the micro-convex for depth or a tight window.
Educational information on handheld ultrasound technique. It does not replace assessment by a qualified clinician.
About the Author
Julien Mercier
Senior R&D Engineer · Medical Ultrasound Transducer Development
Senior R&D Engineer with an M.S. in Applied Physics and over 15 years of experience in medical ultrasound transducer development, specializing in the design verification and performance testing of high-frequency imaging transducers. Currently leading the development and verification of the company’s next-generation high-frequency linear-array transducer, responsible for imaging performance evaluation and reliability analysis in preclinical testing. Brings extensive hands-on experience in piezoelectric element tuning, beamforming parameter optimization, and system-level performance testing.