Out of Plane Needle Technique Ultrasound Guidance Handheld Probe
In the out-of-plane view the needle shows up as a single bright dot. That dot is where the danger hides. It could be the tip, or it could be the shaft with the real tip already pushed deeper, out of the thin slice the probe is imaging. Telling the tip from the shaft is the skill the technique is built on, since a dot mistaken for the tip is how a needle ends up through the back wall of a vessel.
What the out-of-plane view shows
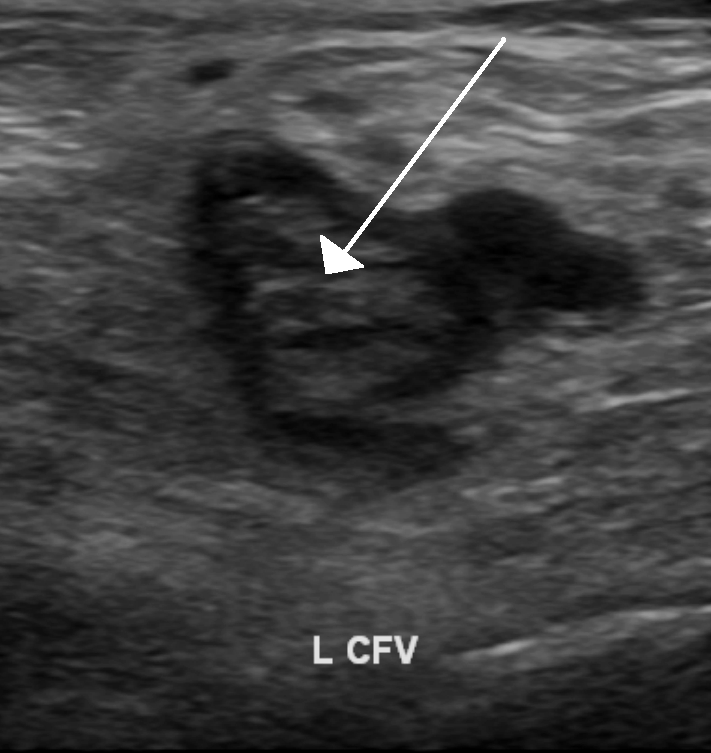
A blood vessel in short axis on ultrasound, here the common femoral vein, the round dark cross-section the out-of-plane view shows. A needle crossing the beam would appear as a single bright dot; the arrow here is from the original image and does not mark a needle. Image: James Heilman, MD, CC BY-SA 3.0.
Out-of-plane means the needle crosses the ultrasound beam. It does not lie along the beam, the way the other technique sets it. The probe is held across the vessel, cutting it in cross section, so the vessel appears as a dark round circle on the screen. The artery or vein sits in the middle, with the structures around it shown in the same frame.
The probe is held square across the vessel, its marker dot to one side so left and right on the screen match the patient. A vessel centered in the image is the one the needle will meet, if it enters below the middle of the probe.
The wide view is the strength of the approach. The operator sees more than the target vessel. Around it, the artery beside a vein, the nerve to avoid, and the depth of each are all on screen. Picking the safest vessel and the clearest path is done at a glance, before the needle goes near the skin.
The needle shows as only a dot. As it crosses the thin sound beam, the screen shows it where it passes through, a single bright point. The full length of the needle is not seen, only the slice the beam cuts. This single point is the root of both what the view does well and what it does poorly.
The tip-versus-shaft problem
The dot on the screen has a problem hidden in it. A point of brightness where the needle crosses the beam could be the needle tip. It could also be the shaft, if the beam is cutting the needle somewhere short of the tip. The two look the same on the screen, a bright dot either way.
The danger is in what the operator cannot see. Believing the dot is the tip, the operator may push on. The real tip has already gone deeper, past the dot, through the back wall of the vessel or into something behind it. The screen shows a tip safely in the vessel when the true tip is somewhere worse.
This is the central skill of the out-of-plane view, knowing whether the dot is the tip. An operator who treats every dot as the tip will, sooner or later, drive a needle further than the screen suggests. The technique turns on telling the tip from the shaft.
The back wall is the structure at greatest risk. A needle thought to be in the vessel, pushed on, can spear straight through the far side into an artery or a nerve behind a vein. In the short axis that deeper structure may not even be in the picture, since the view is a thin slice. The unseen depth is exactly what the tip tracking is there to control.
Walking the beam down to the tip
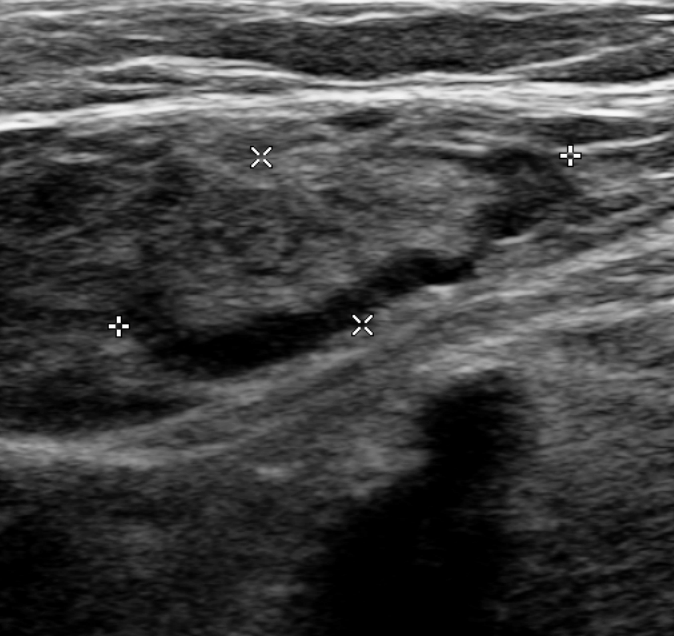
Vessels at the groin in short axis, the round cross-section the probe shows when held across them. Tracking the needle tip keeps it inside this thin slice as the needle advances. Image: James Heilman, MD, CC BY-SA 4.0.
The answer to the dot is to keep moving the beam with the needle, so the dot the operator watches is always the tip. The method has a name, dynamic needle tip positioning. A plainer name is walking the beam down to the tip. It works in small steps. The needle is advanced a little, until its bright dot appears. The probe is then slid or tilted forward, ahead of the needle, until that dot fades and a new view of clear tissue shows. The needle is advanced again to the new spot, the dot reappears, then the probe moves on. At each step the dot that shows is the tip, since the beam has moved to fresh tissue the shaft has not reached. Each round is a step of the needle, then a step of the probe to find the tip again. Done well, the operator never loses the tip and never mistakes the shaft for it. The needle goes in at a steep angle, around 45 degrees, entered close to the middle of the probe so the dot appears soon after the skin. A shallow needle would travel far before the beam reached it. With this tracking, the out-of-plane view performs well. Studies of dynamic needle tip positioning report first-pass success around the mid-90s in percent at the neck vein and the radial artery, against figures in the 70s and 80s for the long-axis approach in the same trials. The tracking is what lifts the short axis past the long. Without it the two run about even. The skill takes practice. A beginner can lose the tip between steps, advancing the needle while the beam is still behind it. The early attempts run slower than a practiced hand would manage. The tracking is a coordination of two hands, the probe in one and the needle in the other, each moving in turn. The needle hand pushes straight in. The probe hand slides ahead at a matched pace, neither racing past the tip nor lagging behind. Get the pace wrong and the dot is lost, the tip somewhere the screen no longer shows. The needle can be primed with saline beforehand, the flush ready, so a flashback in the small vessel is not missed. None of this is needed for a wide, shallow vein a beginner could hit blind. It is the deep or small target, the one worth the scan, that makes the tracking worth learning.
Confirming the dot is the tip
Beyond walking the beam, an operator has ways to test whether a dot is the tip. The simplest is to jiggle the needle. A small wiggle makes the tip move on the screen, so the moving dot is the tip and a still one is the shaft caught higher up.
A tiny injection helps too. A small push of saline through the needle shows as a flicker at the tip, marking where the tip sits. This trick, sometimes called hydrolocation, places the tip when the dot alone leaves it in doubt.
These checks cost a second and save a back-wall puncture. An operator unsure whether the dot is the tip stops to test before pushing on. The habit of testing the dot is what keeps a short-axis stick safe.
The angle and the entry point
Where the needle enters and how steep it runs both matter in the short axis. The needle goes in close to the middle of the probe, so the dot appears in the center of the screen where it is easiest to follow. An entry too far to one side puts the dot at the edge, harder to hold.
The angle is steeper than in the long axis, often around 45 degrees. A simple rule sets the entry point about as far back from the probe as the vessel lies deep, which brings a 45-degree needle to the target right under the probe. A steeper needle reflects less sound back to the probe and can show fainter, one more reason to keep it tracked closely.
Common slips in the short axis
The errors in the short axis all follow from the dot. The first is haste. The needle is pushed faster than the beam can follow. The tip runs ahead of the dot. What the operator watches is the shaft behind it.
A lost dot is the cue to stop.
The fix for haste is order. Move the beam first, the needle second, each in its turn. A second error is the angle. A needle driven down hard reaches the vessel fast, then leaves the beam fast, the dot gone before the tip is placed.
Sliding the probe too far is the third slip, past the tip onto clear tissue with no dot at all. The probe is drawn back until the dot returns, then the tracking starts again. The needle is never pushed while the dot is missing.
How it compares with the long axis
The other way to align the needle is the long axis, the in-plane view, where the probe lies along the needle and the full shaft is seen at once. That approach has its own page. The comparison between the two is worth drawing here.
The two views show different things. The long axis lays the full needle on the screen, shaft and tip together, so the depth of the tip is read straight off the picture. The long axis needs alignment, since the needle and the beam must sit in one plane. A needle that drifts off the plane vanishes. The short axis finds the vessel far more easily. There the needle shows as a single point, so the tip has to be tracked all the way in.
On the raw numbers the two are close. A trial in radial artery lines found first-attempt success near 82 percent for the long axis and 78 percent for the short axis, a small gap either way. A systematic review reached the same verdict, the two about even on first-pass success in plain use.
The short axis pulls ahead once needle tip tracking is added. With dynamic tip positioning, trials report the short axis reaching the mid-90s, with the long axis in the 70s or 80s. The lesson is that the short axis is not better on its own. It is the tip tracking, which the short axis needs and the long axis does not, that makes the difference.
When the short axis suits the job
The out-of-plane view fits the start of almost any vascular scan. The wide cross section is the quickest way to find the target and tell an artery from a vein, with the surroundings shown at the same time. Many operators scan in short axis to choose the vessel, whatever technique they use to enter it.
It suits a shallow vessel especially. A vein close under the skin is reached in a short, steep pass, the dot appearing almost at once, the tip tracked over a short distance. There is little room for the tip to run ahead unseen.
The cross section also helps where structures crowd together. At the internal jugular vein the carotid artery lies right beside it. The short axis shows both at once, so the artery can be watched and kept clear as the needle goes in. A vessel that rolls, like the jugular, can be pinned and centered in the same view. These are jobs the wide picture does well.
Experience changes the picture. A practiced operator works the short axis quickly and safely. The same view gives a beginner more trouble than it looks, more passes and more time, since tracking the tip is a skill built over many attempts. The view is easy to start on. Real skill with it comes only with practice.
Using the short axis on a handheld unit
A handheld unit runs the out-of-plane technique like any other scanner. The operator holds the probe across the vessel, watches for the dot, then walks the beam down to the tip as the needle goes in. The portable form brings the short-axis approach to the bedside, where bedside vascular access happens.
The small screen asks little of the short axis. A handheld display is only a few inches across. The single dot of the out-of-plane view fits it with room to spare, taking up one point and no more. The portable form and the short-axis view suit each other for that reason.
One hand holds the probe while the other drives the needle, with no fixed arm to park the probe between steps. That puts the weight on the walk-down rhythm, since every small slide of the probe is done by hand, the needle waiting. A steady probe hand is the technique on a handheld unit.
Common questions about the out-of-plane technique
What is the out-of-plane needle technique?
It is placing a needle so that it crosses the ultrasound beam. It does not run along the beam, the way the long-axis view sets it. The probe sits across the vessel, which shows as a round circle. The needle appears as a single bright dot where it cuts the beam. It is the short-axis view.
Why is the needle only a dot in the out-of-plane view?
The ultrasound beam is a thin slice. The needle crosses that slice at one place, so the screen shows only that one point, never the full needle. The full shaft is seen only in the long-axis, in-plane view.
What is the main risk of the out-of-plane technique?
The dot can be the shaft, with the true tip already past it. If the operator takes it for the tip and pushes on, the real tip can go deeper than the screen shows, through the back wall of the vessel or into a structure behind it.
What is dynamic needle tip positioning?
It is moving the probe forward in small steps to keep the dot on the screen always at the needle tip. The needle is advanced, the probe is slid ahead to find the tip again. The cycle repeats, so the tip is tracked all the way in.
Is out-of-plane better than in-plane?
On their own the two are about even, with first-attempt success near 78 to 82 percent in trials. The short axis pulls ahead, into the mid-90s, only when dynamic needle tip positioning is added. The short axis is not better by itself.
Can a handheld ultrasound use the out-of-plane technique?
Yes. The short-axis view and the tip-tracking method work on a handheld probe as on any scanner. The operator holds the probe across the vessel and walks the beam down to the tip at the bedside.
About the Author
Julien Mercier
Senior R&D Engineer · Medical Ultrasound Transducer Development
Senior R&D Engineer with an M.S. in Applied Physics and over 15 years of experience in medical ultrasound transducer development, specializing in the design verification and performance testing of high-frequency imaging transducers. Currently leading the development and verification of the company’s next-generation high-frequency linear-array transducer, responsible for imaging performance evaluation and reliability analysis in preclinical testing. Brings extensive hands-on experience in piezoelectric element tuning, beamforming parameter optimization, and system-level performance testing.