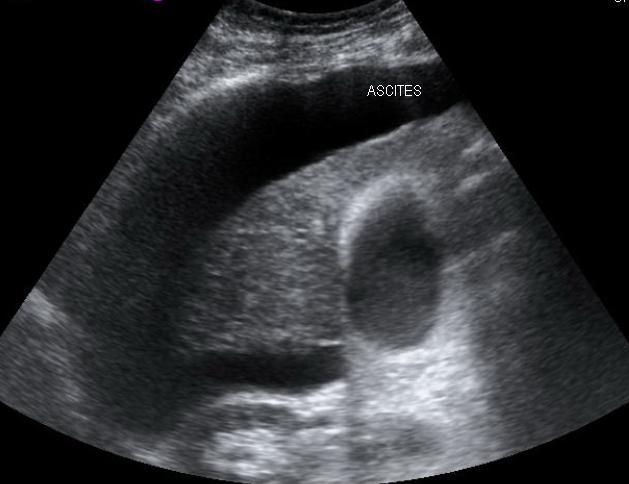
Free peritoneal fluid surrounding a cirrhotic liver on abdominal ultrasound. Credit: Samir, Wikimedia Commons (CC BY 3.0).
Free peritoneal fluid is the easiest finding to detect on handheld ultrasound and the hardest to quantify. The detection is honest; the volume estimate is a guess dressed up as a number. What the bedside scan can answer with confidence is whether fluid is present, where the largest pocket sits, and whether that pocket is safe to drain. What it cannot answer well is how many milliliters lie inside the cavity or whether the fluid is what it looks like. The job at the bedside is to find the fluid, mark the tap site, measure the depth at the marked point, and write down what cannot be settled until the lab returns. Done well, the scan ends with a patient who can be tapped safely or referred upstream without anyone re-doing the work.
Where the fluid pools first
The peritoneal cavity is a deformable bag, and fluid finds its lowest available point. In a supine patient that point depends on the size of the pocket. Small volumes settle into the deepest dependent recesses: Morison’s pouch between the right kidney and the liver, the left subphrenic space, the bilateral paracolic gutters, and the pouch of Douglas behind the bladder. Large volumes fill these recesses and then overflow into the rest of the cavity, surrounding bowel loops and flowing forward against the anterior abdominal wall. The pattern of filling tells the operator how much fluid has accumulated even before measurements begin.
The first place to look in any suspected case is Morison’s pouch. A thin anechoic stripe between the liver edge and the kidney capsule, visible on the right intercostal scan, signals that ascites is present at volumes as low as around 100 milliliters in a typical adult abdomen. A small black sliver here is a finding, not a noise artifact. Confirm with a parallel look at the splenorenal interface and the rectovesical or rectouterine pouch. The double check across both sides of the abdomen rules out false positives from artifact or a small contained collection that mimicked free fluid in one window.
The pelvis catches what gravity sends downward. In the patient who can tolerate it, scanning the pelvic windows last in the abdominal sweep often confirms what the upper-quadrant views suggested. A full bladder helps as an acoustic window; an empty bladder is the requirement for any planned pelvic tap. The fluid sweeps behind the uterus or behind the bladder, separating loops of small bowel from the pelvic walls. A clean pocket here is a clean candidate site for drainage if the upper-quadrant view supports it.
Choosing the tap site
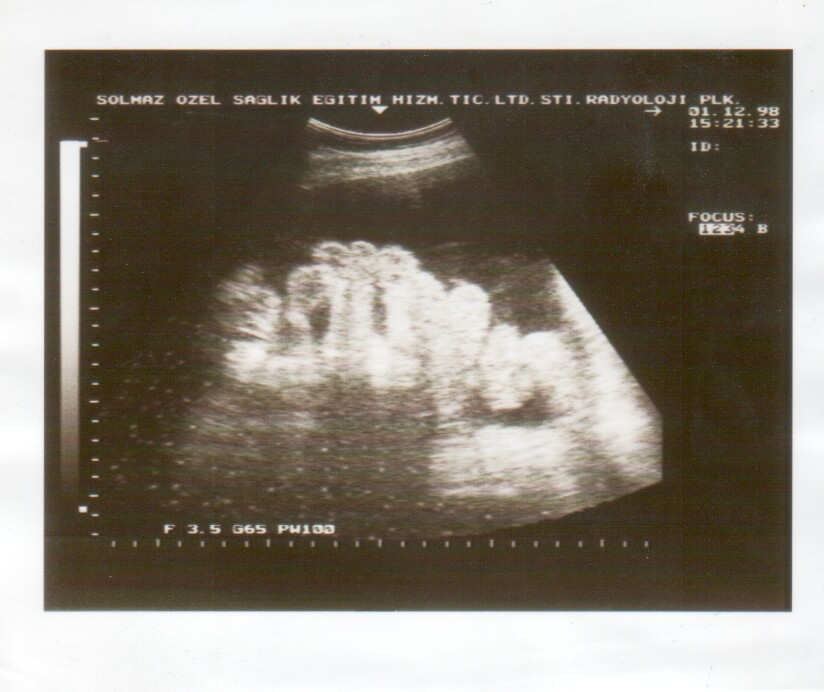
Free peritoneal fluid pocket with bowel loops floating inside, the appearance the operator wants at the planned tap site. Credit: Nevit Dilmen, Wikimedia Commons (CC BY-SA 3.0).
The classic paracentesis site is in the left lower quadrant, two finger-breadths medial and two finger-breadths cephalad to the anterior superior iliac spine, lateral to the rectus abdominis muscle. The choice is anatomical and the anatomy is the reason for the choice. The inferior epigastric artery runs along the lateral border of the rectus, ascending from the external iliac vessels to anastomose with the superior epigastric branch at the upper abdomen, and a blind tap that strays medially into the rectus belly puts the artery directly in the needle path. The LLQ site keeps the entry lateral to the rectus and away from the artery, in a region where the anterior abdominal wall is thin and the cavity directly beneath is usually filled with fluid in moderate or large ascites. Before any needle goes through skin, ultrasound is asked to confirm three things at the site. The first is the fluid depth from the skin surface to the pocket, measured in centimeters with the probe held perpendicular to the skin, which tells the operator whether the planned needle length will reach the cavity and how far past the abdominal wall the tip will sit before it can drain freely. The second is the pocket depth itself, measured from the parietal peritoneum to the far wall: shallower than around 1.5 cm at the planned site is not a comfortable tap, while 3 cm or more is. The last is the absence of bowel or any solid structure in the planned needle path, confirmed by sweeping the probe through the entry track and watching bowel loops move freely within the fluid rather than sitting fixed against the anterior wall. Color Doppler is applied across the chosen entry point with the probe rocked through the path the needle will take, checking for the inferior epigastric artery or any small wall vessel that crosses the track. The artery is identifiable as a pulsatile flow at the rectus border; a small branch vessel may appear only on careful sweep at low PRF and high color gain. The site is marked on the skin with the probe pressed firmly, lifted straight up so the indent does not drift, and the mark made with sterile ink before the patient moves. The full pre-tap protocol takes around two minutes once the operator is comfortable with the four steps, and the time spent on it is the difference between a routine bedside drain and a complication that brings the rapid response team into the room. The same protocol scales upward: a slightly larger pocket changes nothing in the workflow, while a markedly small pocket or a poorly visualized track moves the procedure out of the bedside and into a setting with real-time guidance.
Adhesions from prior abdominal surgery complicate the picture. Bowel loops that float freely in fluid are the safe sign; bowel loops fixed to the anterior wall are the warning sign. The distinction is made by watching the loops over a respiratory cycle. A free loop slides under the anterior wall with each diaphragmatic excursion; an adherent loop stays put while everything else moves. If adherent bowel sits anywhere along the planned needle path, the site moves. Old midline scars, lower-quadrant scars from previous appendectomies or cesareans, and any visible incision near the planned point all flag for an alternative site or referral to interventional radiology.
The 1.5 cm pocket depth is the safety threshold. Below that, the needle tip drains briefly and then sucks bowel or anterior wall once the pocket collapses. A pocket of 3 cm or more is the comfortable range; between 1.5 and 3 cm is workable but slow and tends to clot quickly. The depth measurement that informs the call is the depth at the planned site in the position the patient will be in for the tap, not the depth at some other window. The same patient repositioned can show entirely different numbers.
The bladder is the structure that gets in the way of pelvic taps. A distended bladder rises into the lower abdomen and crowds the pelvic fluid pocket, sometimes occupying the entire space behind the symphysis. Asking the patient to void before the scan, or draining a Foley to gravity, restores the usable fluid pocket. The bladder edge needs to be confirmed below the pubic symphysis on the sagittal view before any pelvic site is selected for tap. Skipping this check is a routine error.
Bowel loops floating in fluid is the cleanest reassuring sign at the tap site. Loops that hang in the pocket, drift with respiration, and separate from the anterior wall as the patient breathes in tell the operator that the wall and the bowel are not stuck together. A pocket without floating loops, where the wall and the loops below it look continuous, is a pocket where adhesions cannot be excluded without longer observation or formal radiology guidance.
Volume the screen does not measure
Volume estimates from B-mode are educated guesses, not measurements. The semi-quantitative grading used in practice covers four buckets: minimal ascites is fluid only in Morison’s pouch or the pelvis with no other findings, small ascites adds fluid in one or two recesses, moderate ascites surrounds the bowel loops with separation visible, and large ascites bulges the abdomen with bowel loops floating in a clearly massive pocket. The grading carries clinical weight and tracks roughly with management decisions, but no operator should hand a number in milliliters to the team unless the patient has just been imaged on CT.
The single number to record is the anteroposterior depth of the deepest fluid pocket at the planned tap site. That number drives the tap decision and gives the next imager something to compare. Six centimeters is large; three centimeters is workable; one centimeter is not. The same depth measured serially across days gives a more honest picture of accumulation than any volume estimate could. The chart that records this number across admissions catches reaccumulation before the patient looks for it, and the trend over weeks is often more useful than any single point measurement.
Not all peritoneal fluid is ascites
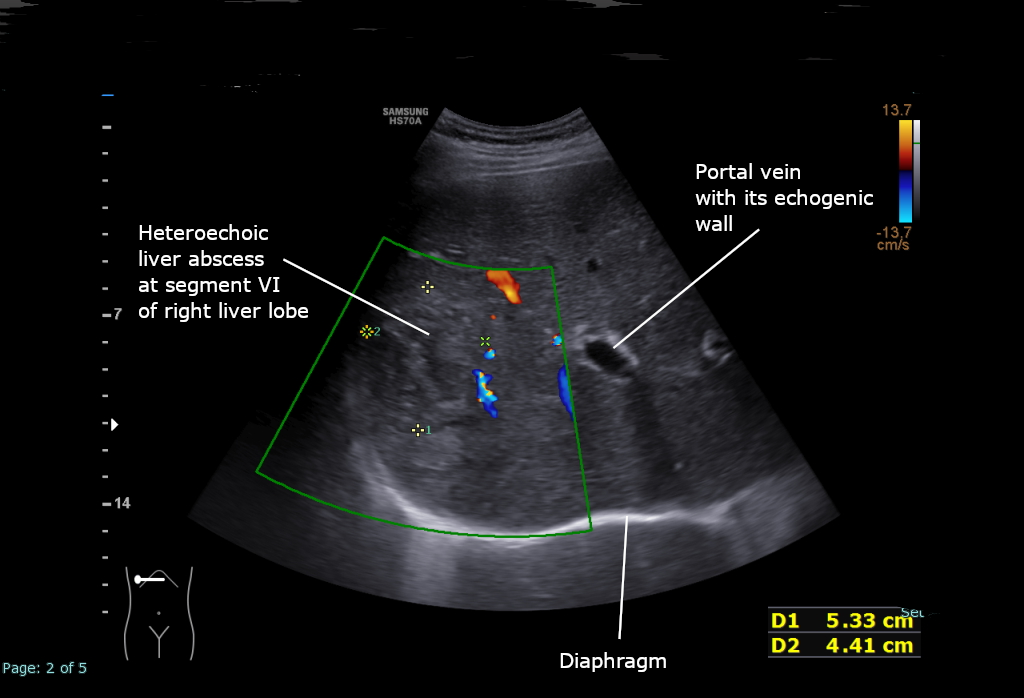
Segment VI liver abscess on B-mode, a loculated collection that does not respond to blind bedside tap. Credit: Cerevisae, Wikimedia Commons (CC BY-SA 4.0).
Hemoperitoneum reads differently. Fresh blood in the abdominal cavity carries echogenic debris, swirling particles, and a layering pattern that simple ascites does not show; older blood appears as septated collections with internal echoes. A trauma patient with free fluid is bleeding until proven otherwise; the fluid is the finding, the source is the workup, and a tap at the bedside is not the answer. Hemoperitoneum from ruptured ovarian cysts, ectopic pregnancy, or splenic injury all read as echogenic free fluid; the clinical setting tells the operator which suspicion list to open.
Loculated fluid is the second category that changes the management. A collection with thick walls, internal septations, or a clear boundary from the rest of the cavity is not free ascites and tends to indicate abscess, post-surgical fluid, or organized hematoma. Loculations and septations need contrast imaging or radiology drainage; they do not respond to blind bedside taps and may worsen if punctured into bowel through a thin pseudo-wall. The classic post-operative loculation around an anastomosis sits with a chronic-looking fluid mantle that often deceives the bedside operator into a quick tap that does more harm than the original fluid did.
Pseudoascites describes the situations where something looks like free fluid and is not. A markedly distended bladder seen on a sagittal view can resemble a large central fluid pocket; the way to distinguish it is to identify the bladder wall and to ask the patient to void. Dilated fluid-filled bowel loops in obstruction can mimic loculated ascites; the peristaltic movement of the wall and the air-fluid layering inside the bowel separate it. Mesenteric cysts and large ovarian cysts have walls and do not flow with respiration.
Malignant ascites and infected ascites are the two situations that hand the diagnostic answer back to the lab. On B-mode the fluid often looks identical to simple cirrhotic ascites, though peritoneal nodules along the mesentery or omentum may be visible at higher frequencies and signal carcinomatosis. Spontaneous bacterial peritonitis carries no specific B-mode appearance at all; the white count from the diagnostic tap settles the question. The handheld scan’s job in these settings is to find a clean tap site, deliver the sample to the lab, and avoid creating new findings of its own through a complication during sampling. The differentiation lives in fluid chemistry and microbiology; the imaging contribution is logistical, getting the right needle into the right pocket and getting the patient back to bed without bleeding.
About the Author
Julien Mercier
Senior R&D Engineer · Medical Ultrasound Transducer Development
Senior R&D Engineer with an M.S. in Applied Physics and over 15 years of experience in medical ultrasound transducer development, specializing in the design verification and performance testing of high-frequency imaging transducers. Currently leading the development and verification of the company’s next-generation high-frequency linear-array transducer, responsible for imaging performance evaluation and reliability analysis in preclinical testing. Brings extensive hands-on experience in piezoelectric element tuning, beamforming parameter optimization, and system-level performance testing.